Airstrip tutorial for Photoshop
Required skills in photoshop 8: Open, save document. Create, change order of and rename new layer. Select and use different painting tools. Change brush type and size.
Steps:
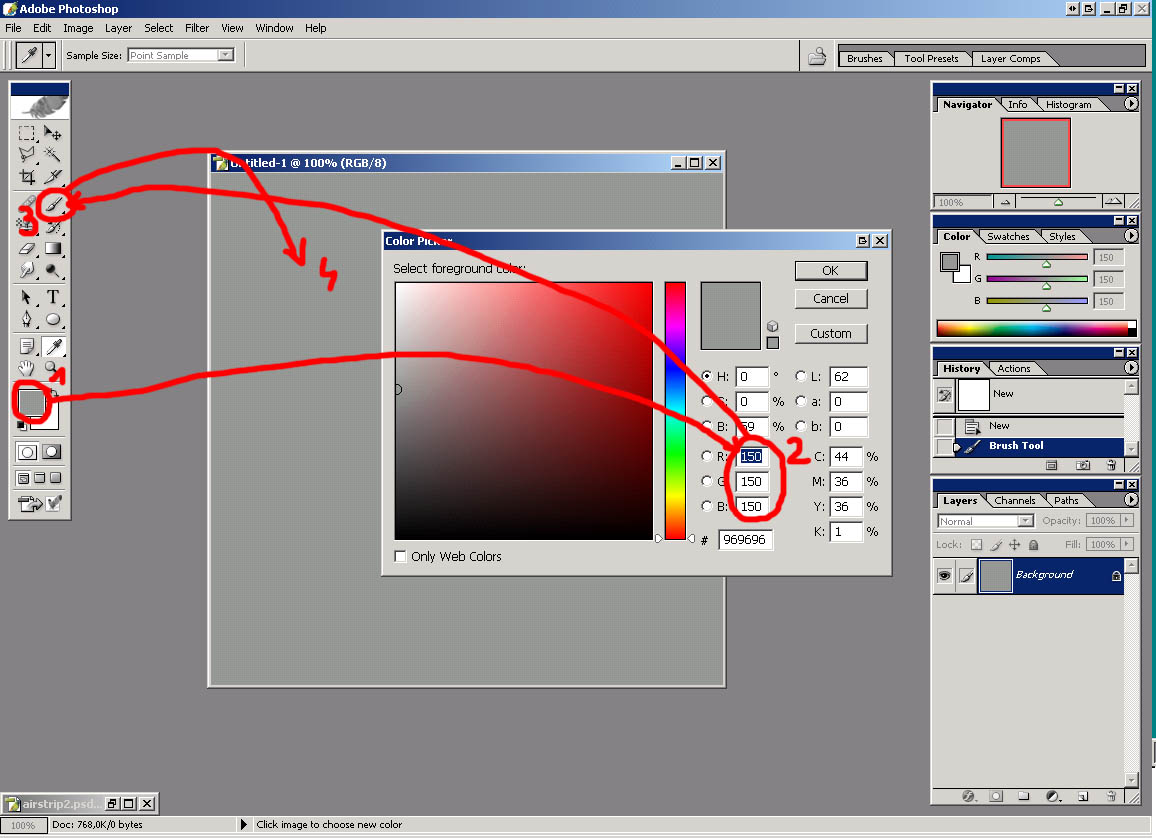
1) I'm going to use 512x512 pix picture in this tutorial. Open new picture 512x512 pix.(File->New) Click on Set foreground color (marked 1), set RGB to 150, 150, 150 for gray color (2). Click on brush tool (3) and paint picture gray.(Use larger hard brush for that)
2) Create new layer (left click on 1) name it Ground (double click on 2). Select polygonal lasso tool (left click on 3) and mark airstrip area (4). Mind the parallelism.

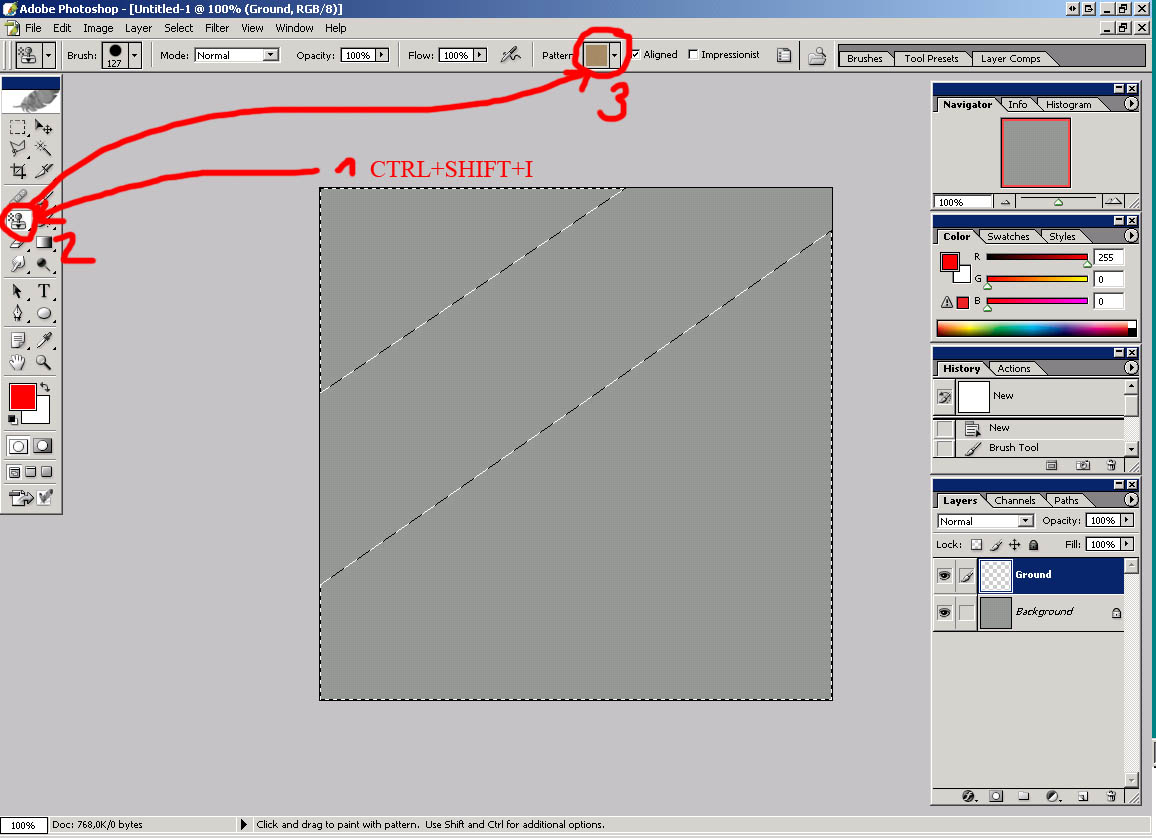
3) Go Select->Inverse or press CTRL+SHIFT+I to inverse selection. Select pattern stamp tool (2) and pattern for ground around airstrip. I'll use dodamsand8 for that.
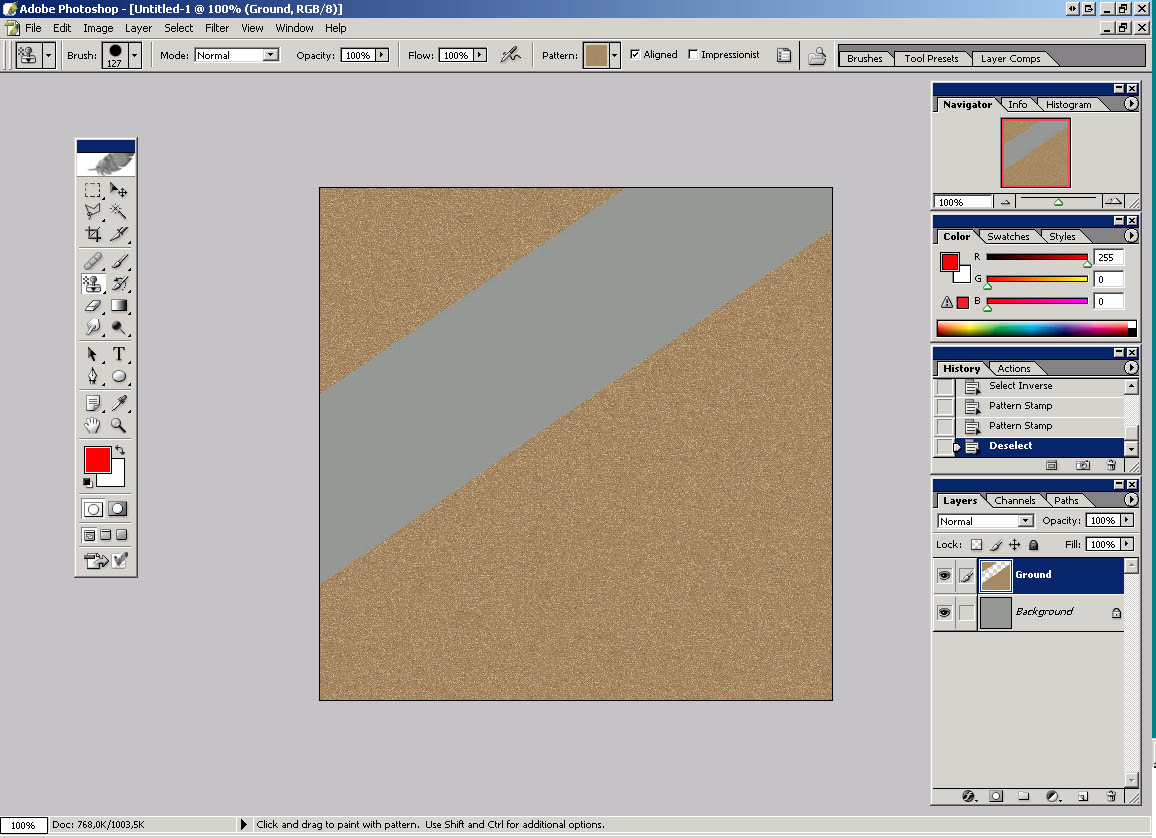
4) Paint on selection. After that press CTRL+D to deselect.
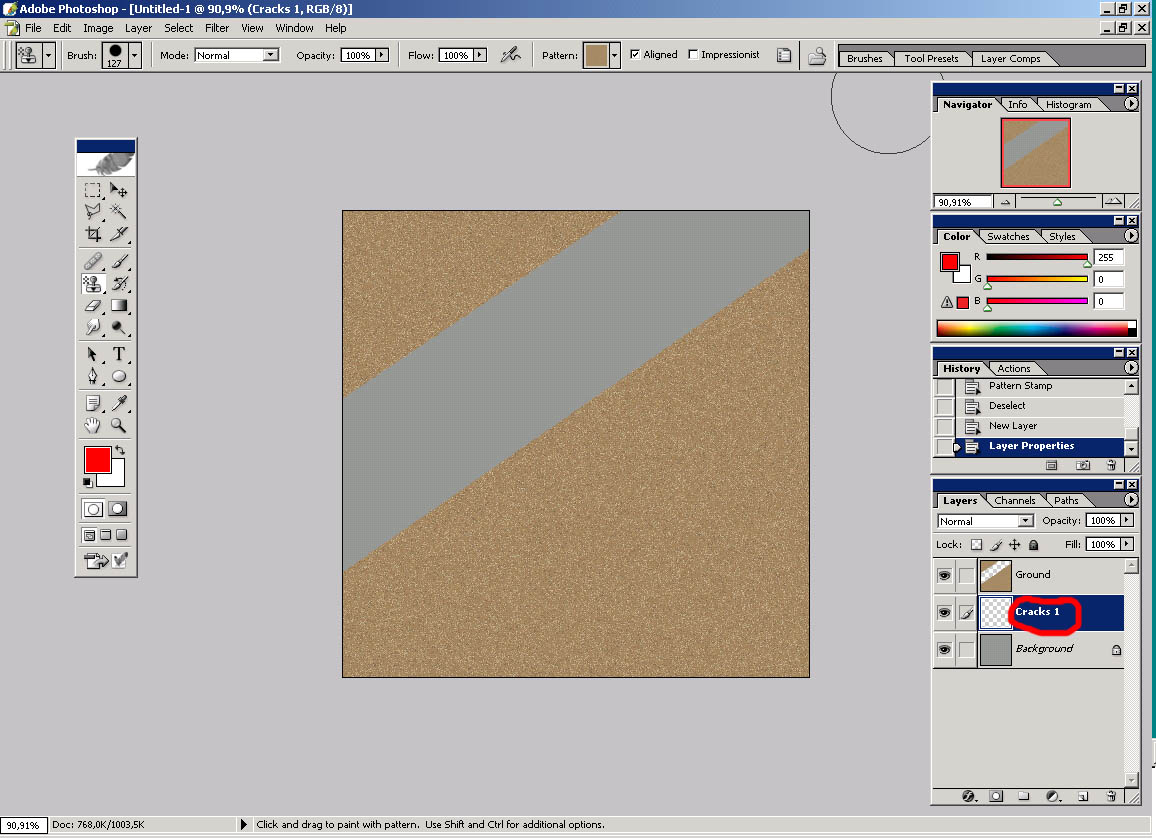
5) Create new layer on top of Background and name it Cracks 1
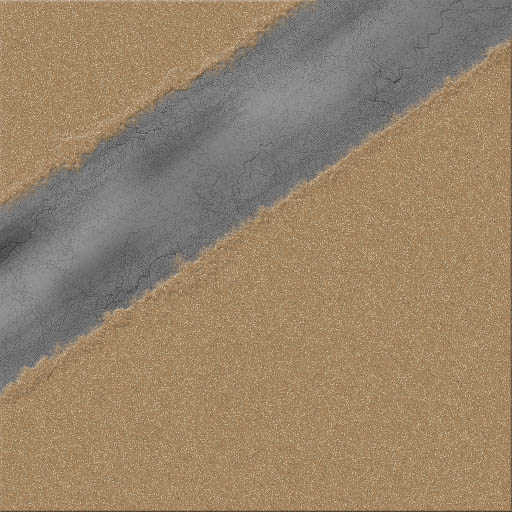
Go File -> Open->find file Cracks.tga open it and define it as pattern (Edit->Define Pattern):
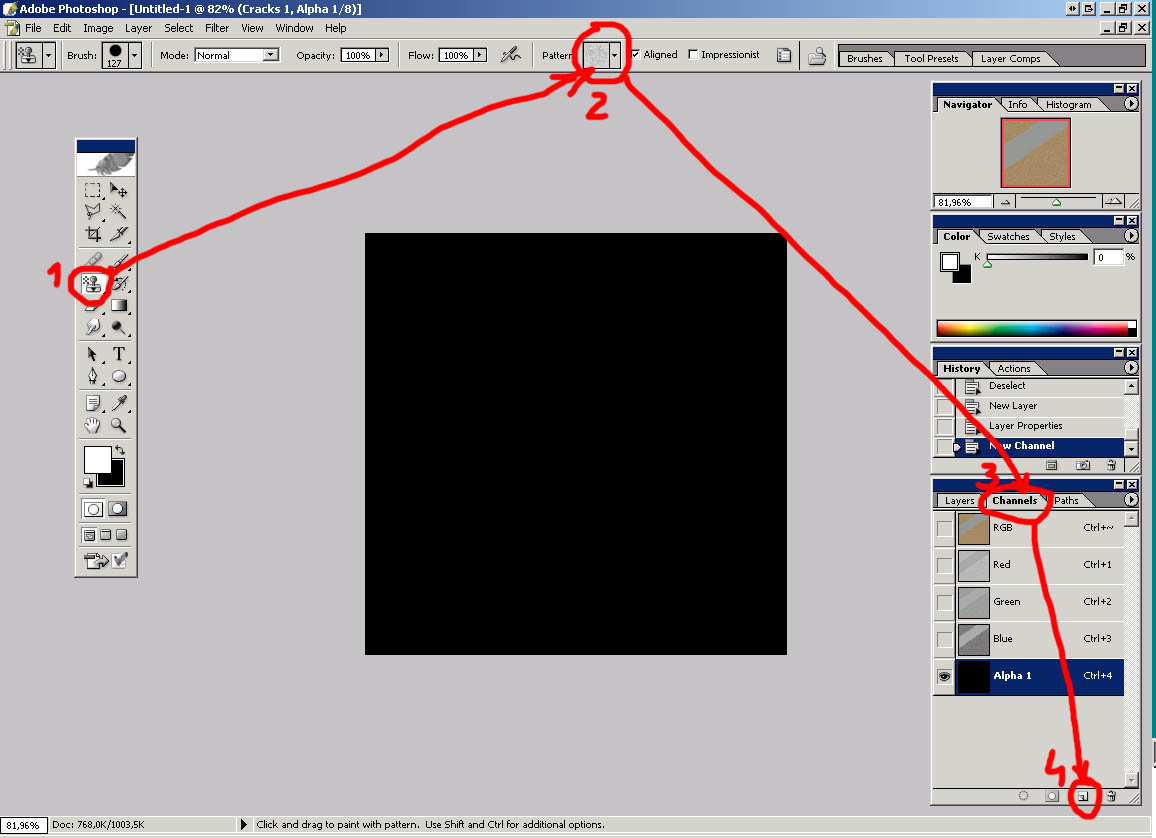
6) Select Pattern stamp tool (1) , select Cracks pattern defined in previous step (2), click on channels tab (3) and define new channel (4). (Image is supposed to be black, don't worry.)
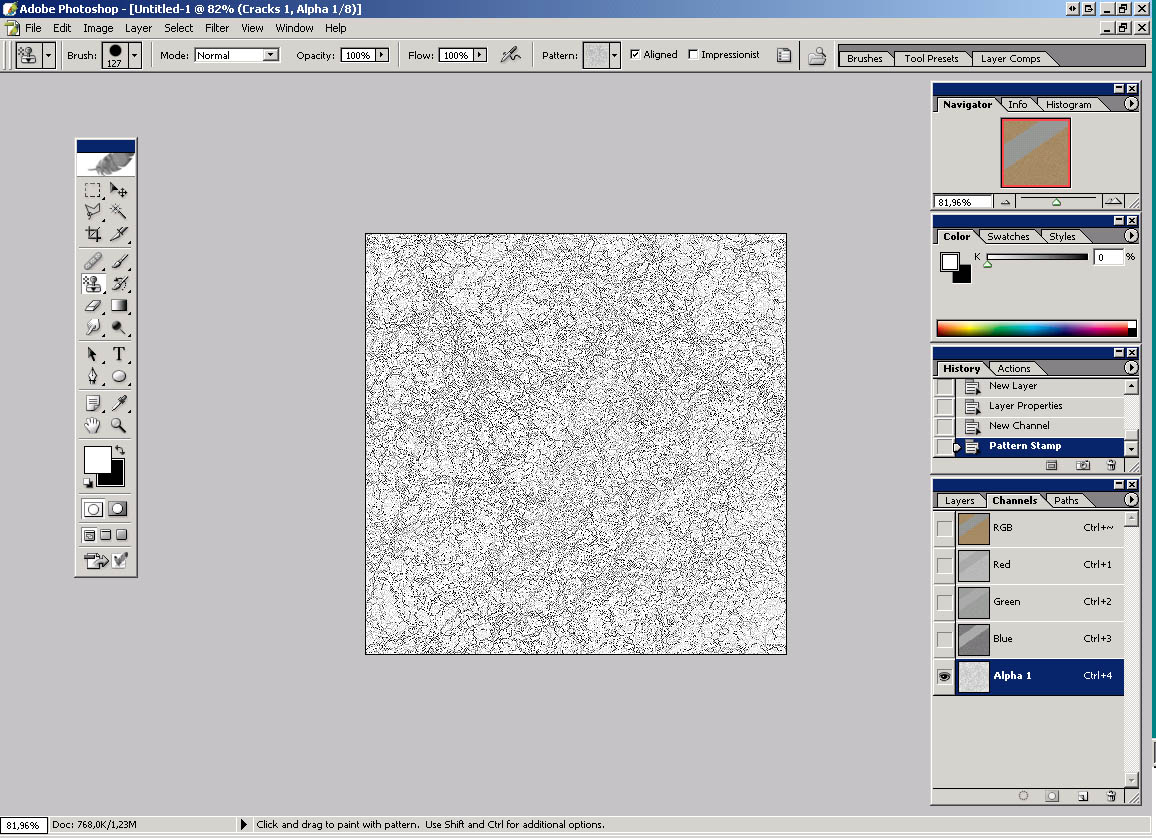
7) Paint new channel with cracks pattern. Hold CTRL and left click on new channel (Alpha 1).
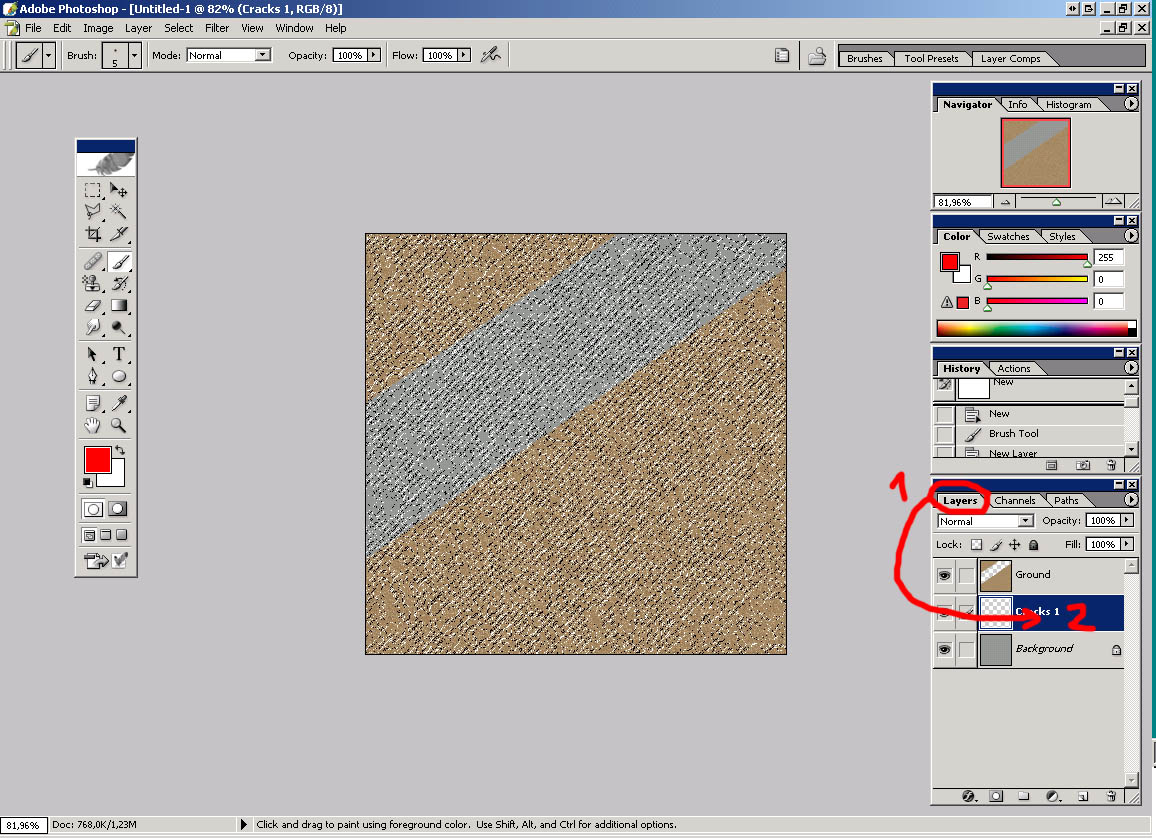
8) SHIFT+CTRL+I to select inverse. Click on Layers (1) and click on Cracks 1 layer (2).
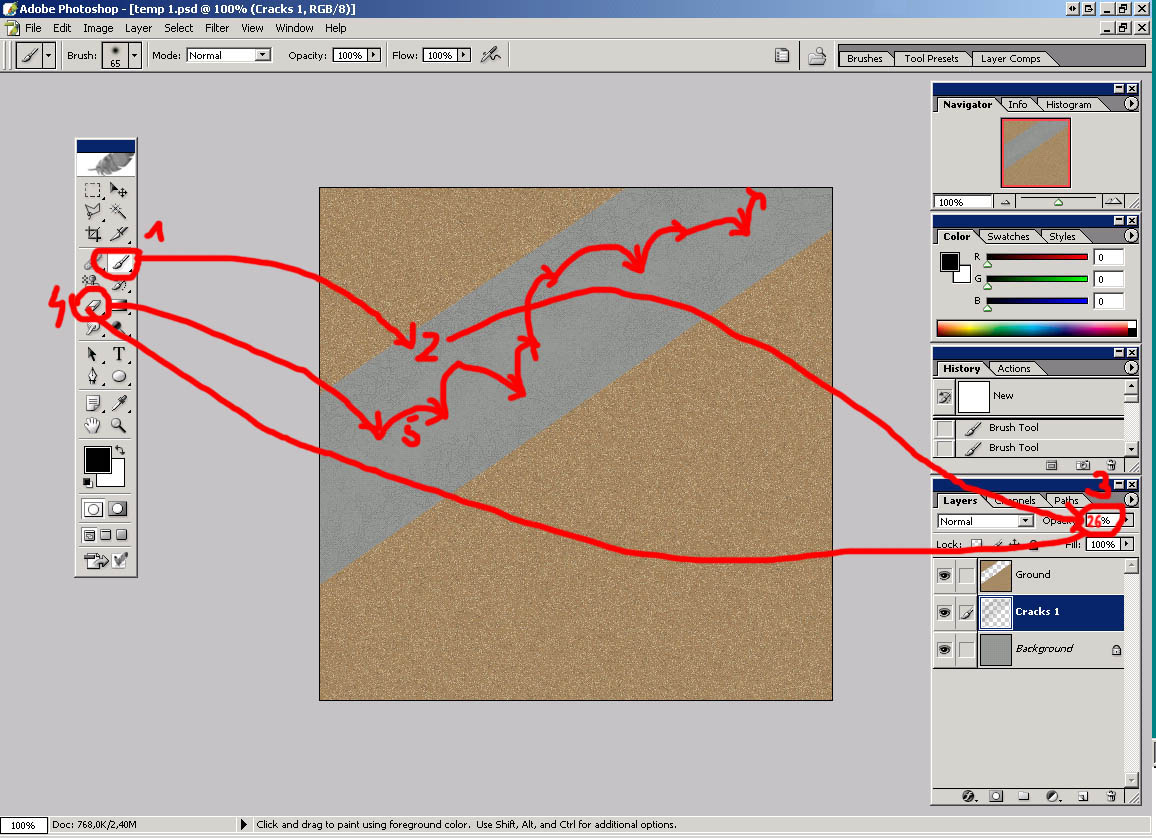
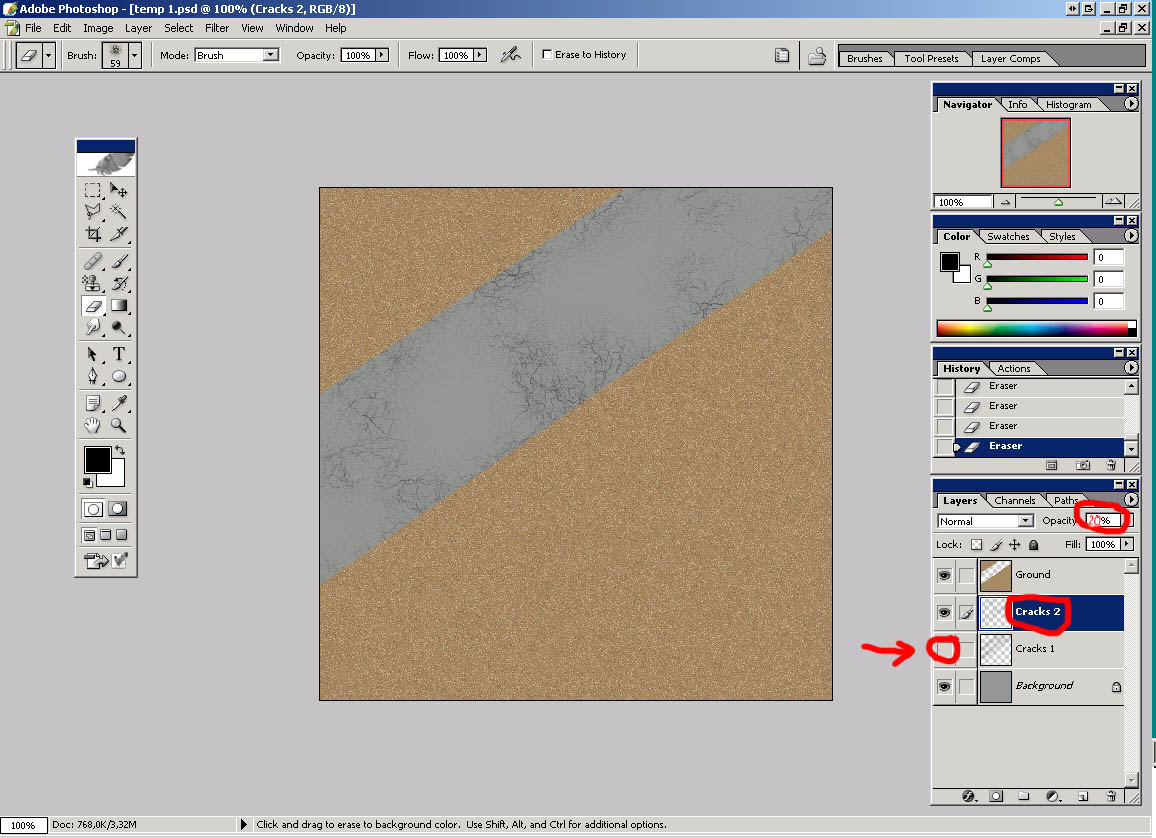
9) Use Brush tool with black color (1) and paint on airstrip area (2). Change opacity for Cracks 1 layer to 26 % or so (3). Use Eraser tool (4) with 59 pix spatter brush to erase bits of Cracks 1 layer (5) to break uniformity. I suggest to erase more in the middle of airstrip.
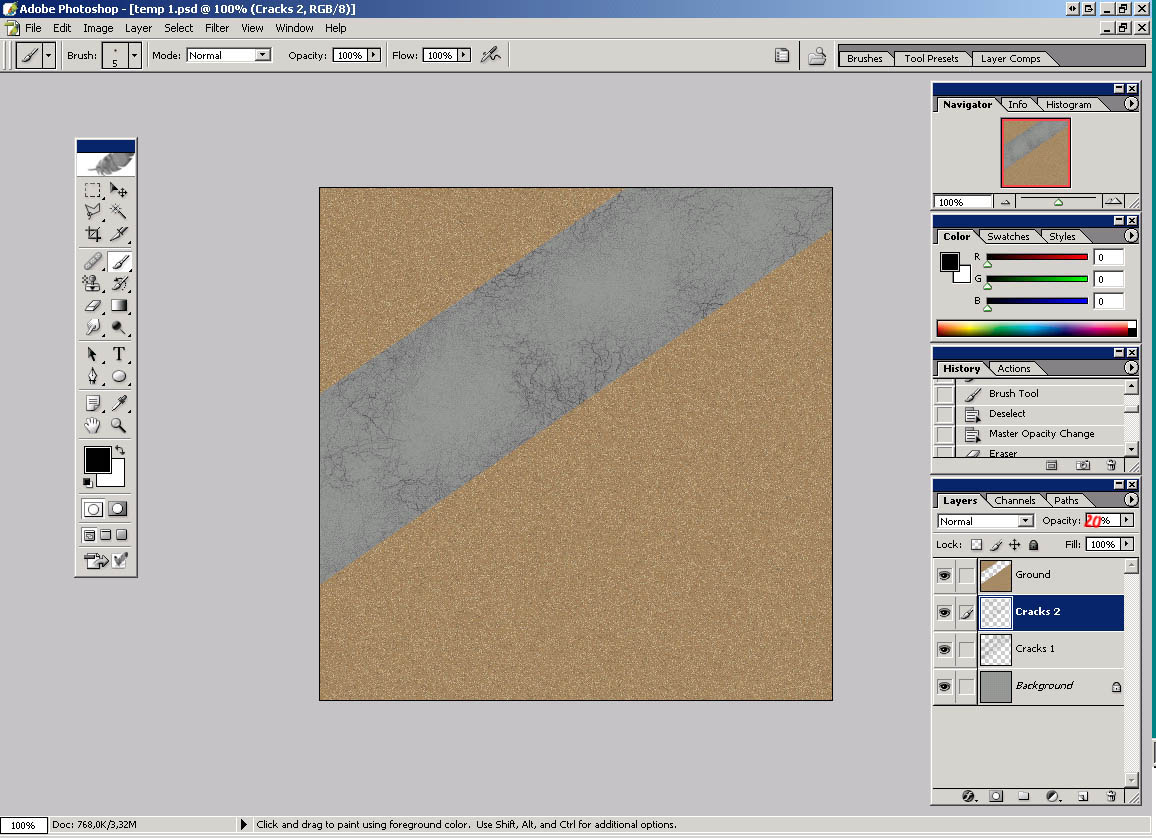
10) This step will be repeating steps 5-9 with new pattern on a new layer. Create new layer above layer Cracks 1, name it Cracks 2, open Cracks2.png, define it as pattern. Select Pattern stamp tool, select Cracks2 pattern just defined, click on channels tab and define new channel. (Image is supposed to be black, don't worry.) Paint new channel with Cracks2 pattern. Hold CTRL and left click on new channel (Alpha 2). SHIFT+CTRL+I to select inverse. Click on Layers and click on Cracks 2 layer. Use Brush tool with black color and paint on airstrip area. Change opacity for Cracks 2 layer to 29 % or so. Use Eraser tool with 59 pix spatter brush to erase bits of Cracks 2 layer to break uniformity. Erase a lot more than in step 9. I made layer Cracks 1 invisible so it can be easier to see what I have done.
11) This is how it looks like with both layers (Cracks 1 and Cracks 2) turned on.
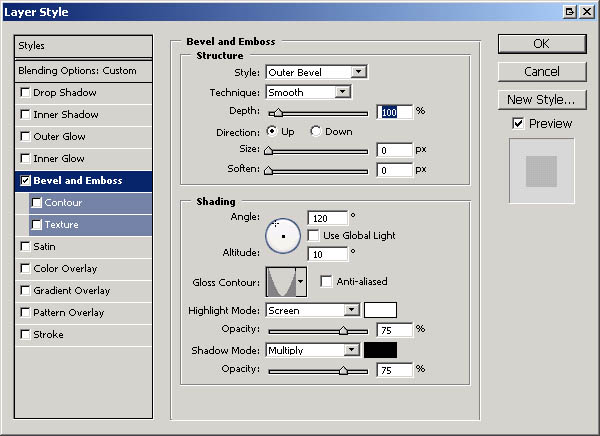
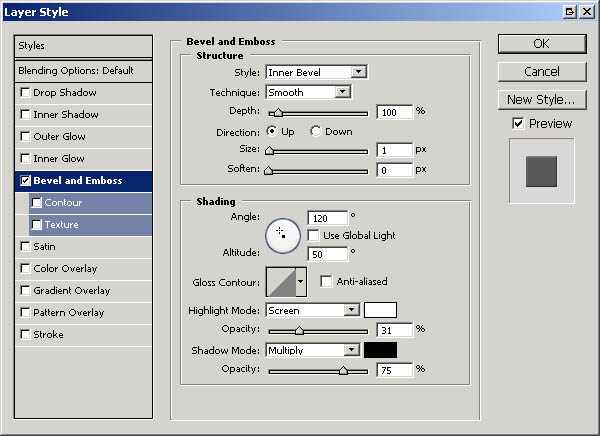
12) Create new layer above layer Cracks 2 and name it Cracks 3. (Don't worry it's the last cracks layer :). Of course, you can go on as much as you like) Go Layer->Layer Style->Bevel and Emboss or just double click on Cracks 3 layer (not on name Cracks 3 - it is for renaming layer, but sideward) and set options for it as in the picture below.
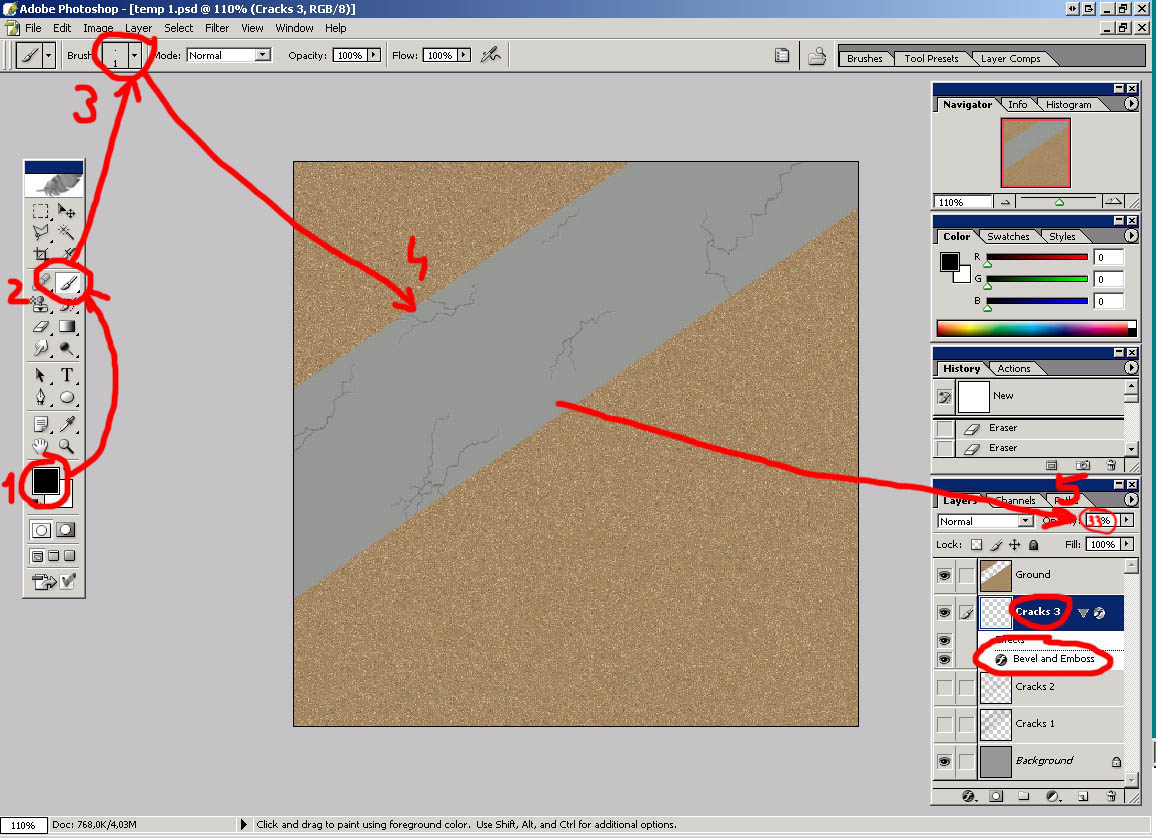
13) Select black color (1), click on Brush Tool (2) and set it's size to 1 pix hard brush (3). Paint cracks on airstrip. Try not to overdo it. On this picture I turned Cracks 1 and Cracks 2 layer off so you can see what I painted. I suggest to use zoom and then paint cracks. Change opacity for that layer to about 33 % (5).
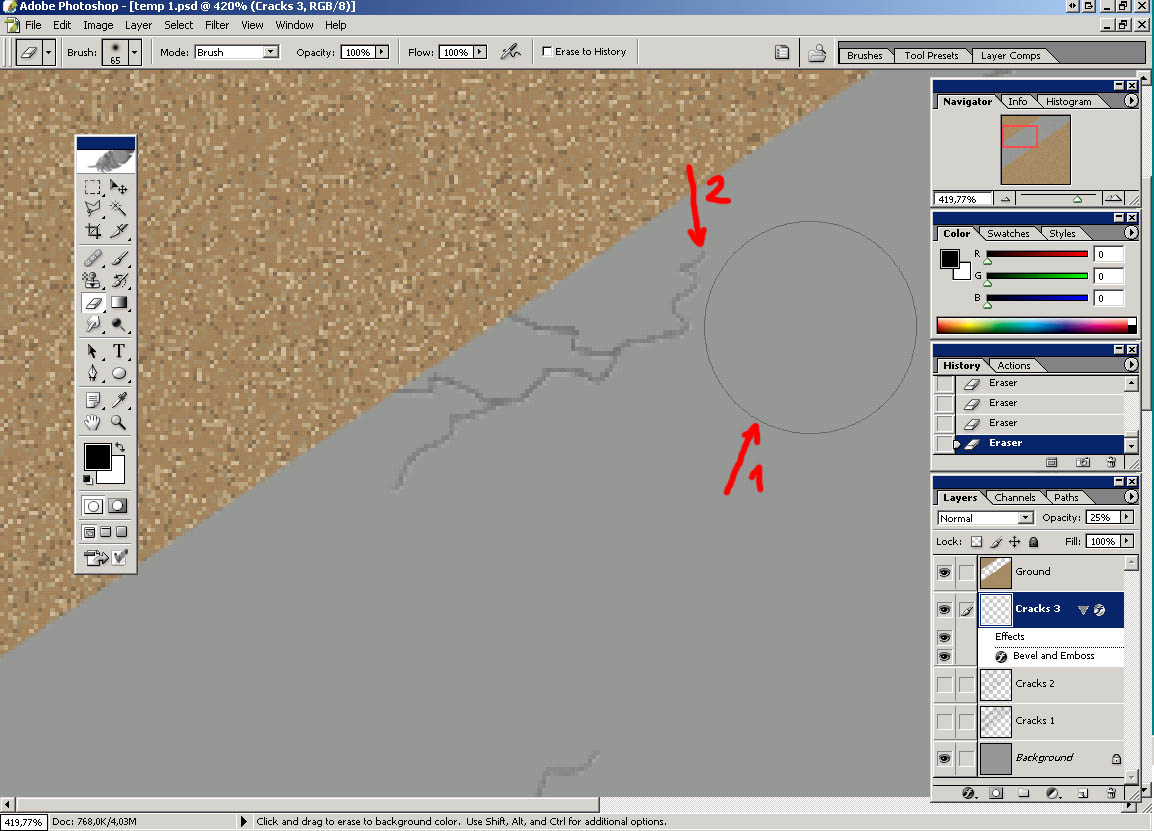
14) When you are done with painting cracks on Cracks 3 layer select Eraser Tool, soft round brush 100 pix for it. Arrow 1 on picture below points at 100 pix eraser brush, arrow 2 points at crack. You must place your eraser brush close to end of the crack but not on crack and click 1,2 or 3 times (depending on distance of the brush and crack). The idea is to lighten all ends of all cracks to achieve fading so it will look like crack is getting shallower toward the end of it. (Picture is zoomed.)
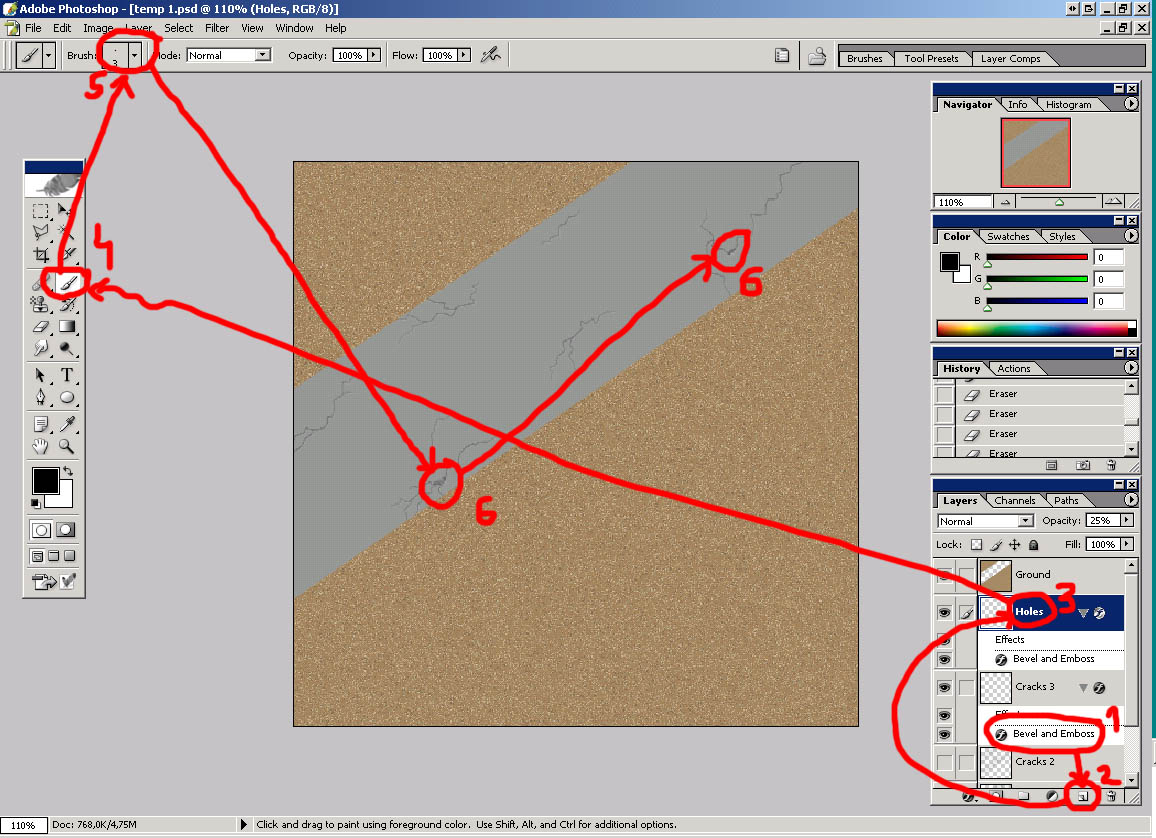
15) This step can be done on Cracks 3 layer but i rather use another layer (It's easier to correct things). Right click on Effect (Bevel and Emboss) of layer Cracks 3 -> Copy layer style. Create new layer (1), name it Holes (3), right click on it->Paste layer style. Select brush tool (4), use smaller brush - I used hard round 3 pix (5) and paint holes on airstrip (6). Holes should be placed onto cracks on Cracks 3 layer.
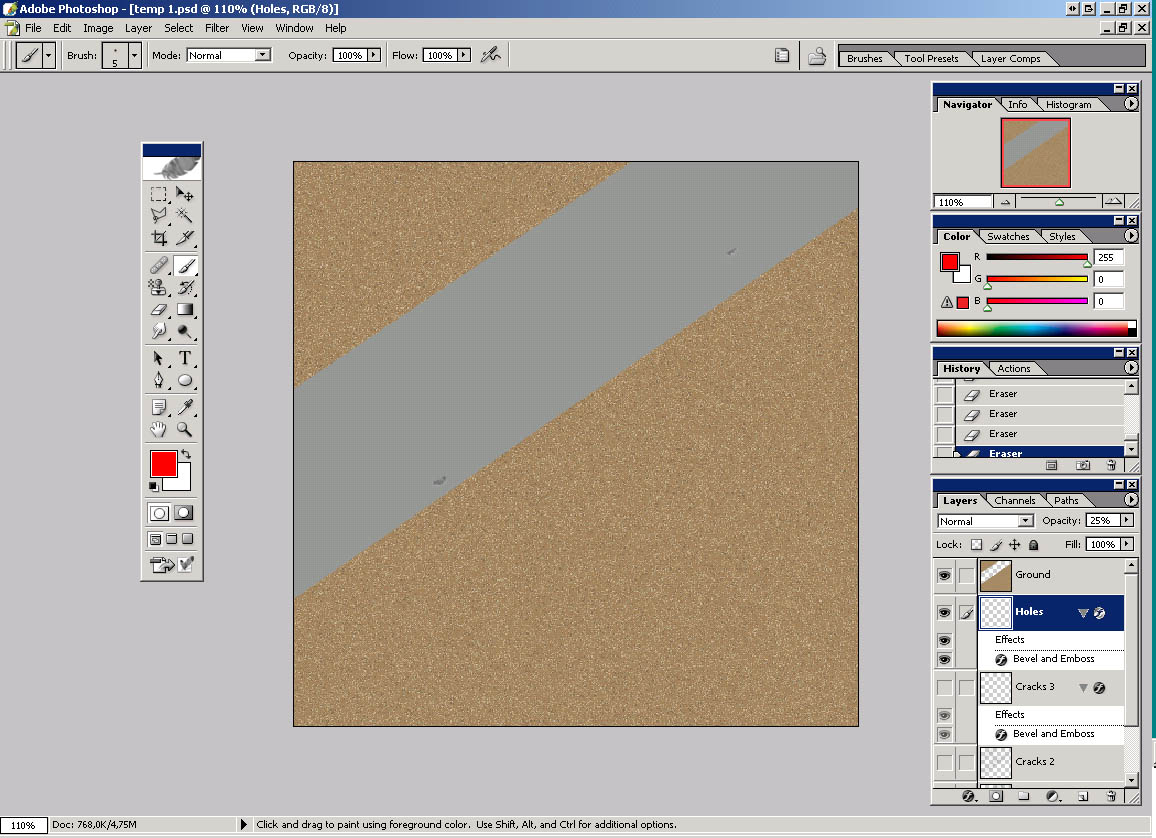
16) Here is how it looks like with all cracks layers turned off. Try not to overdoit as well.
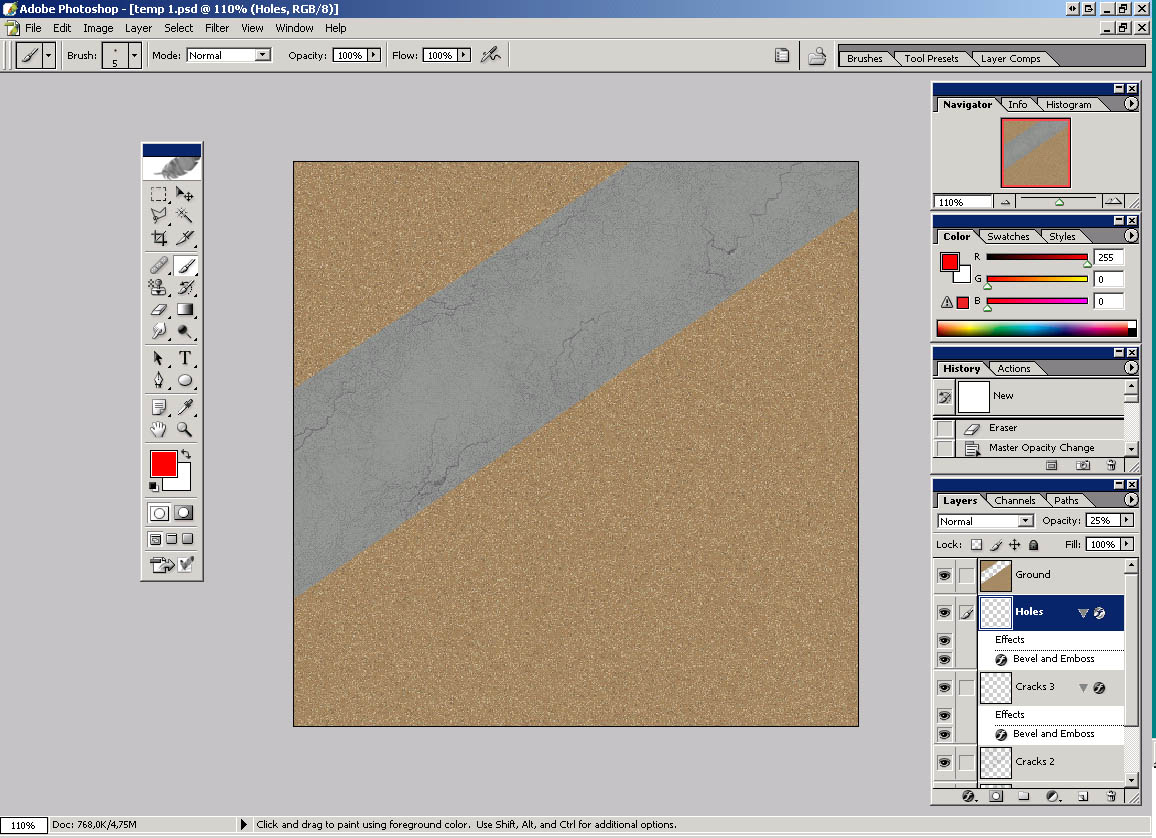
17) This is what we have so far with all layers turned on.
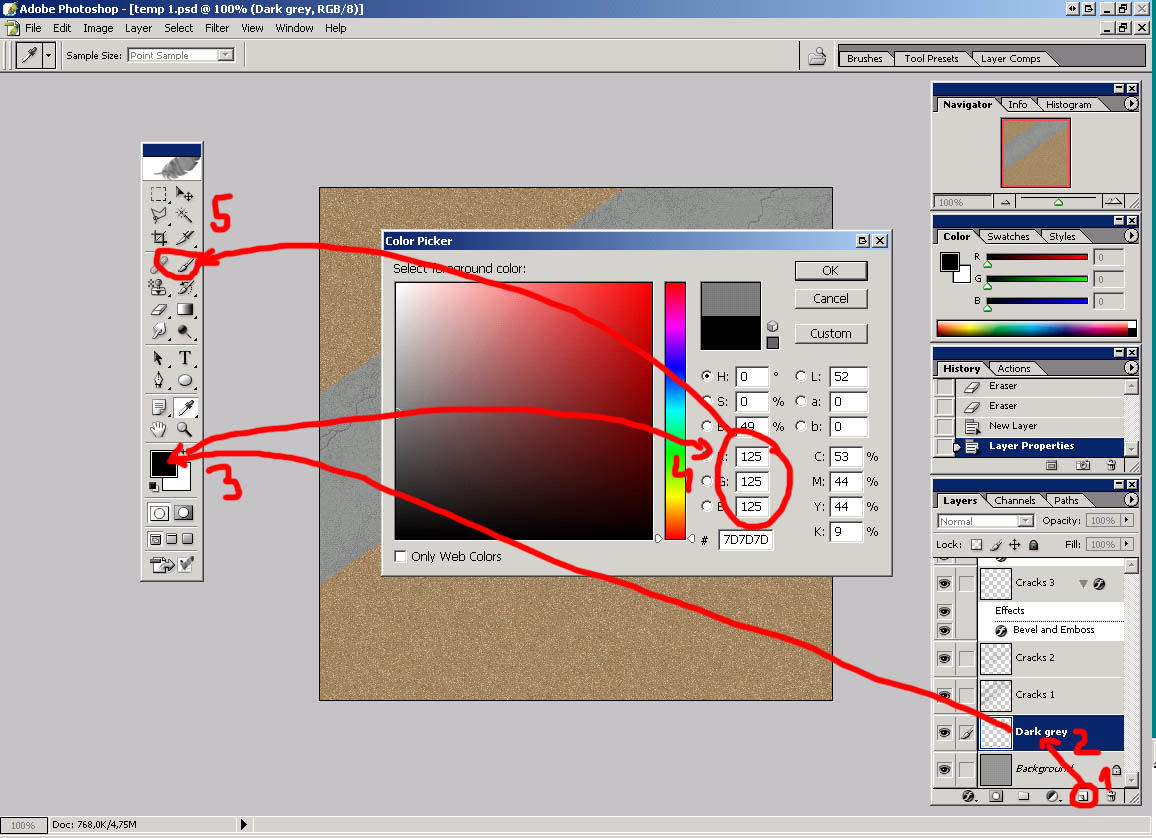
18) Create new layer (1) just abowe Background layer and name it Dark grey (2) (How intuitive and intelligent :)). Click on Set Foreground color (3) and set RGB to 125,125,125 (4). Select beush tool (5).
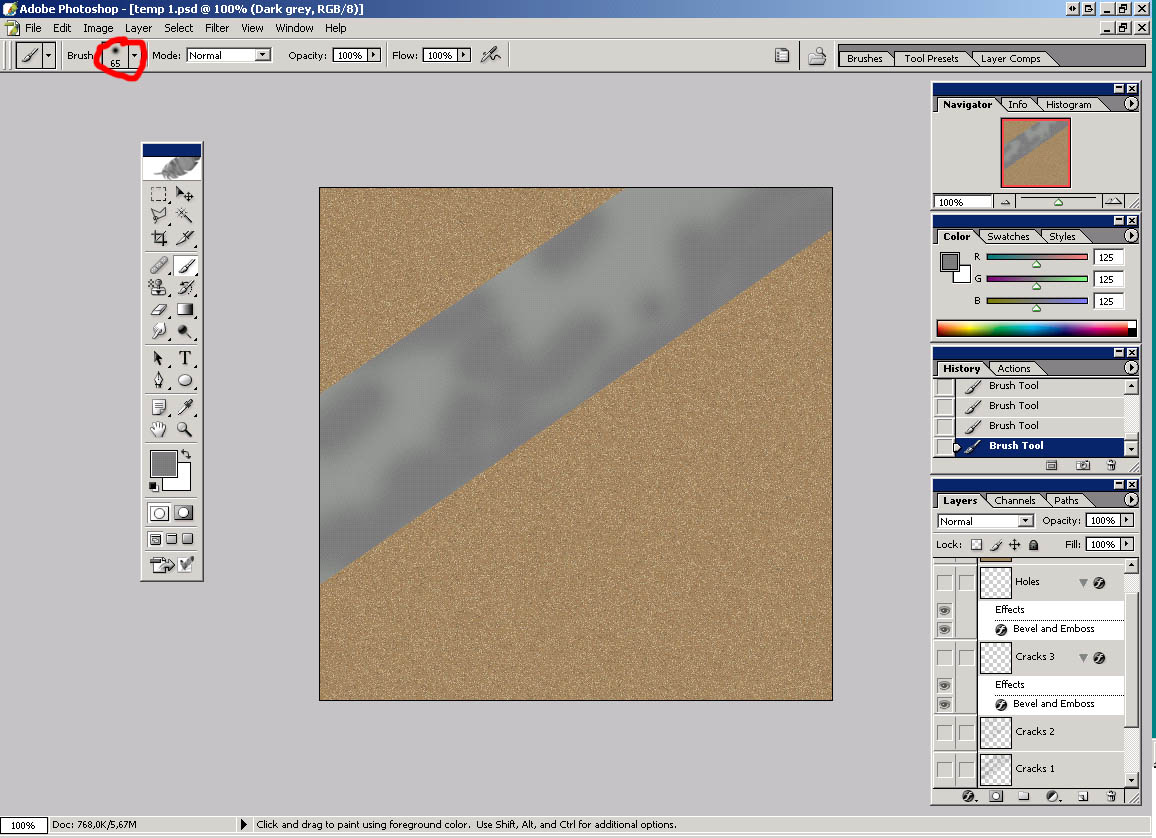
19) Paint on airstrip like on picture below with 65 pix soft brush. (All cracks and holes layers are turned off so it can be seen better what I painted.)
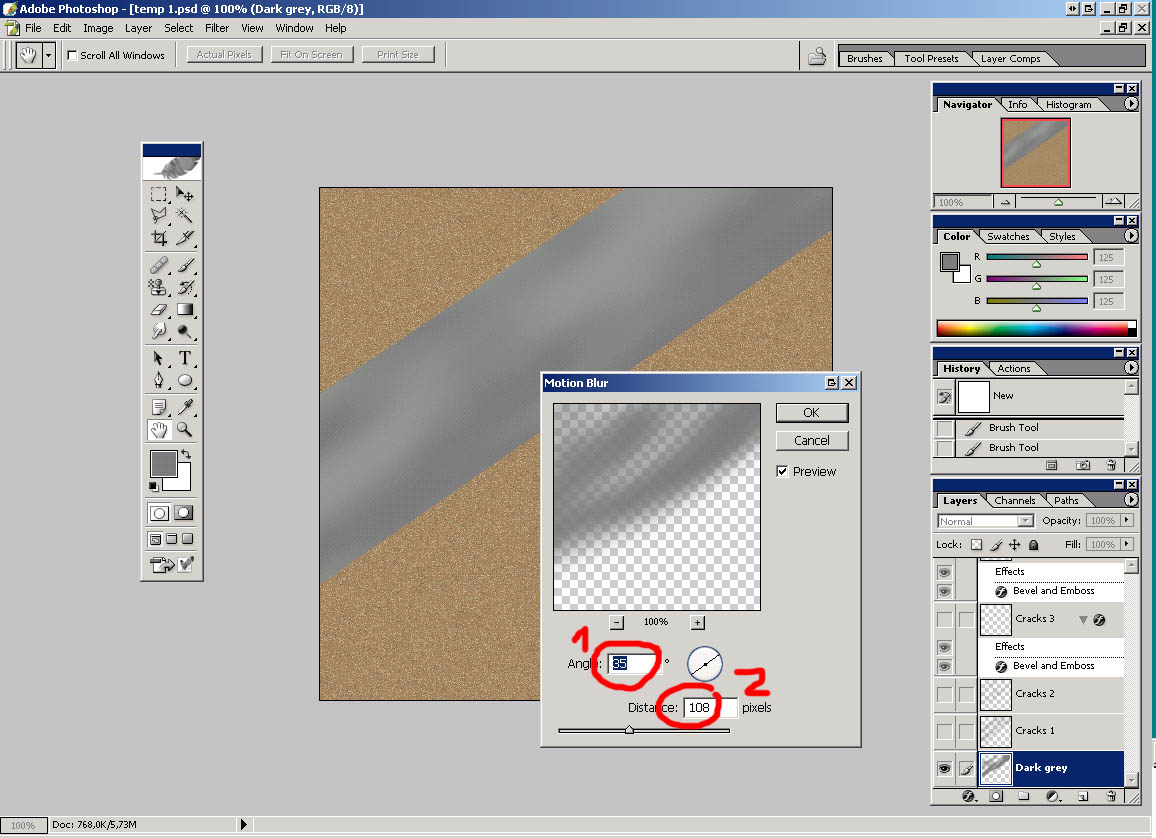
20) Go Filter->Blur->Motion blur. Adjust angle to match airstrip line, set distance to 108 pix and click on OK. It should looks like on the picture below.
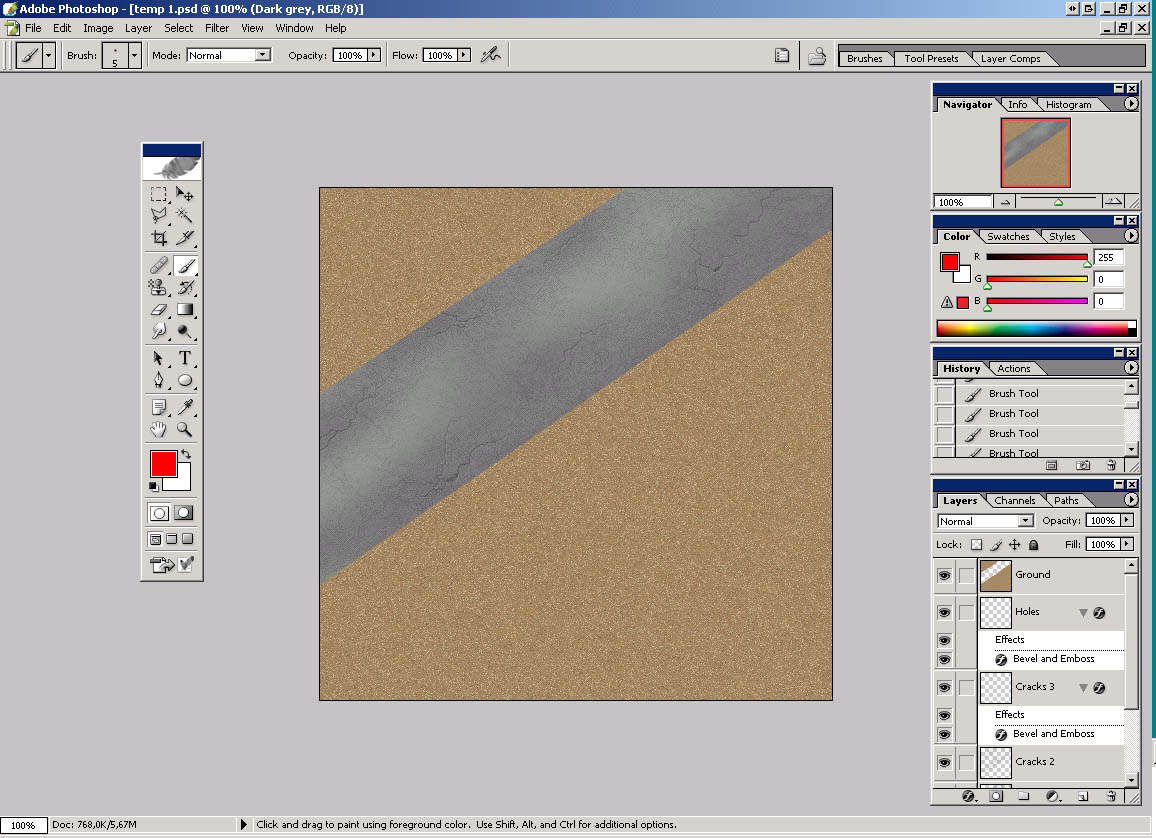
21) Now we'll paint some tire tracks and oil stains on airstrip. The picture should look like this before that.
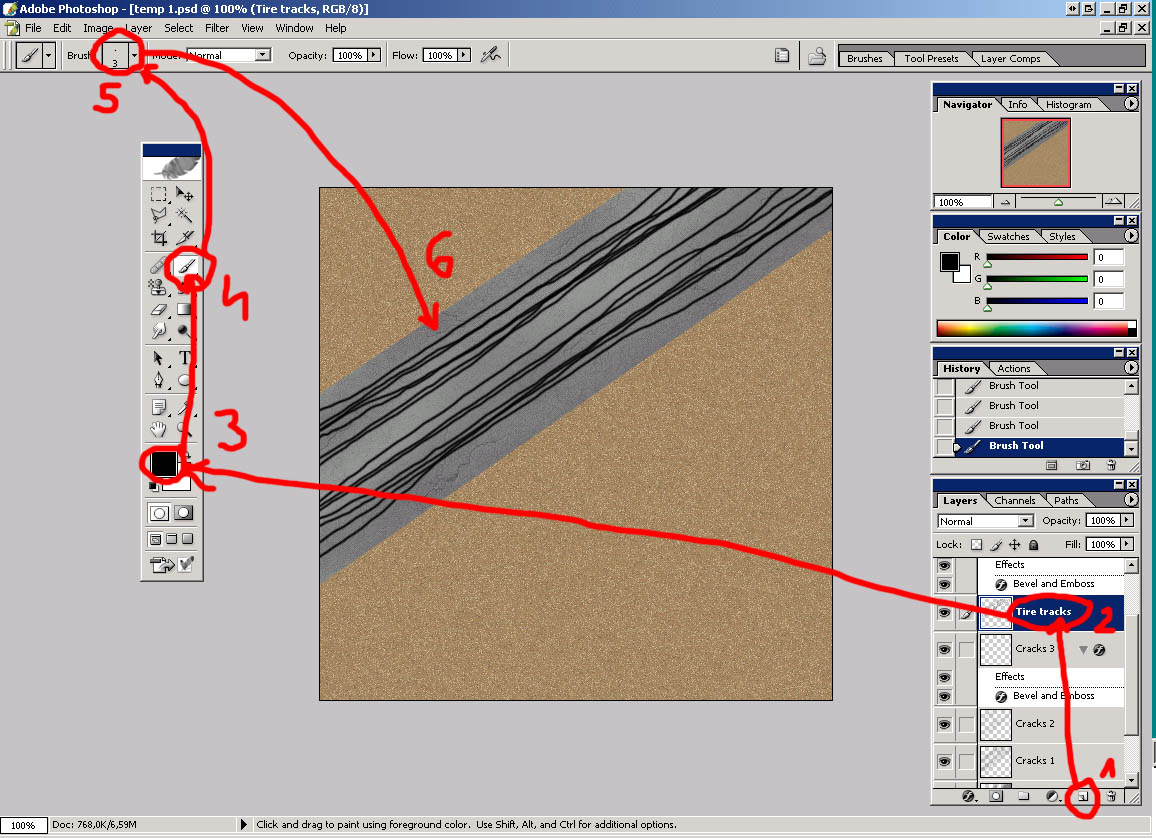
22) Create new layer above Cracks 3 layer (1) and name it Tire tracks (2). Select black color (3), use Brush tool (4), 3 pix brush (5) and paint lines on airstrip like in the picture below (6). Concentrate lines in two groups where tires hit airstrip in most cases. (You can experiment with number of lines here.)
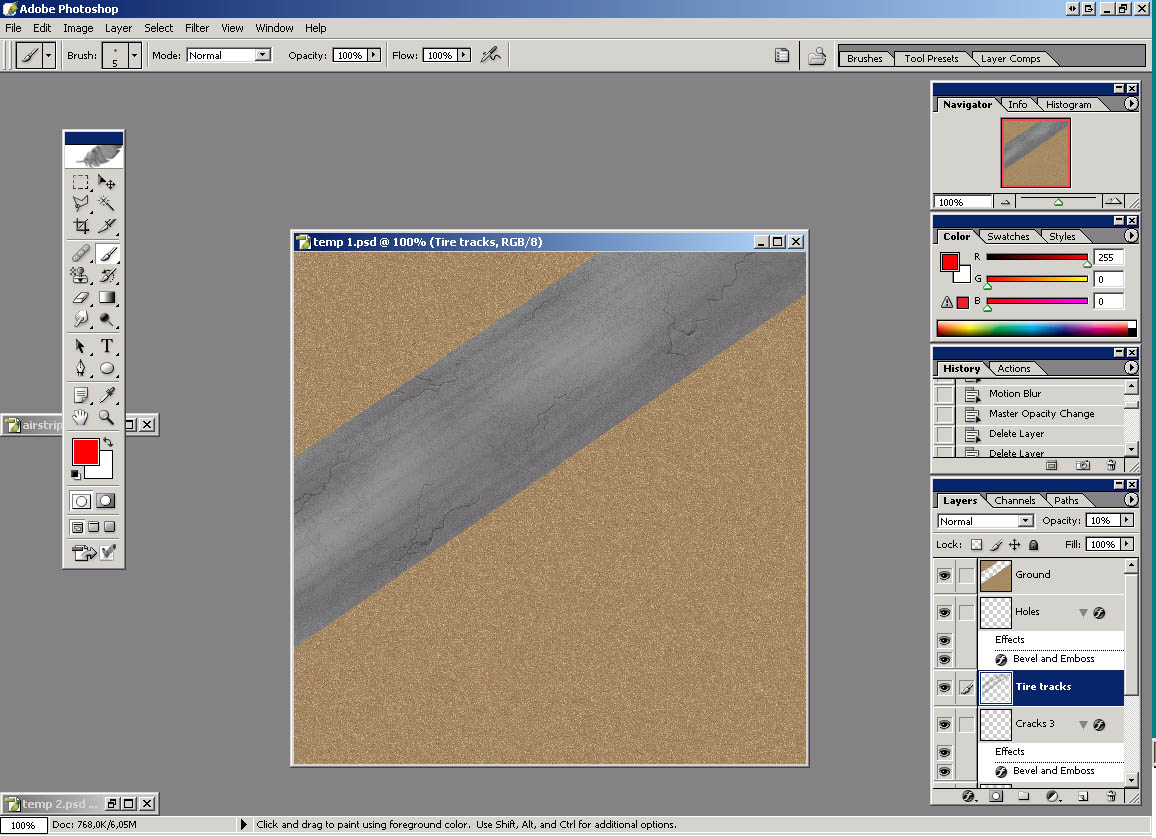
23) Go Filter->Blur->Motion blur. Adjust angle to match airstrip line, set distance to 108 pix and click on OK. It should looks like on the picture below. (You probably won't need to touch anything here; it is the same settings as in step 20.)
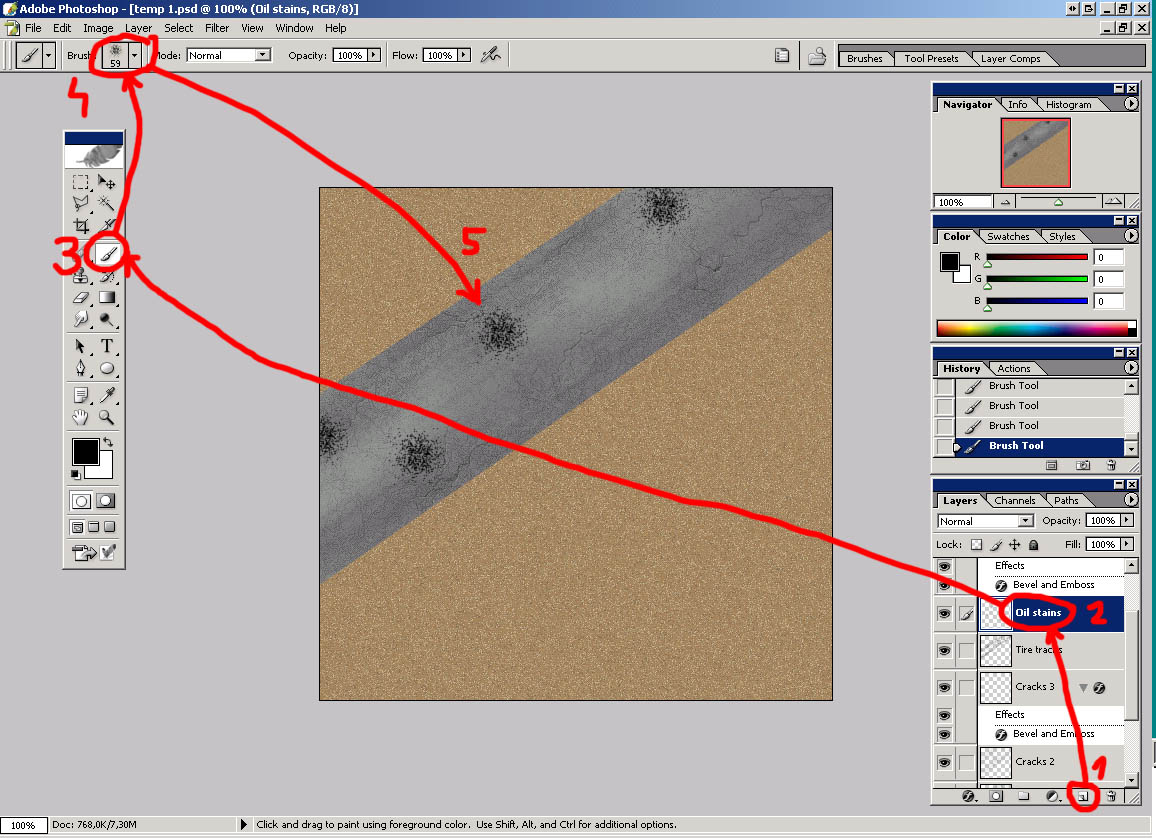
24) Create new layer (1), name it Oil Stains (2), select brush tool (3), black color, 59 pix spatter brush (4) and paint with one click here and there on the airstrip (5).
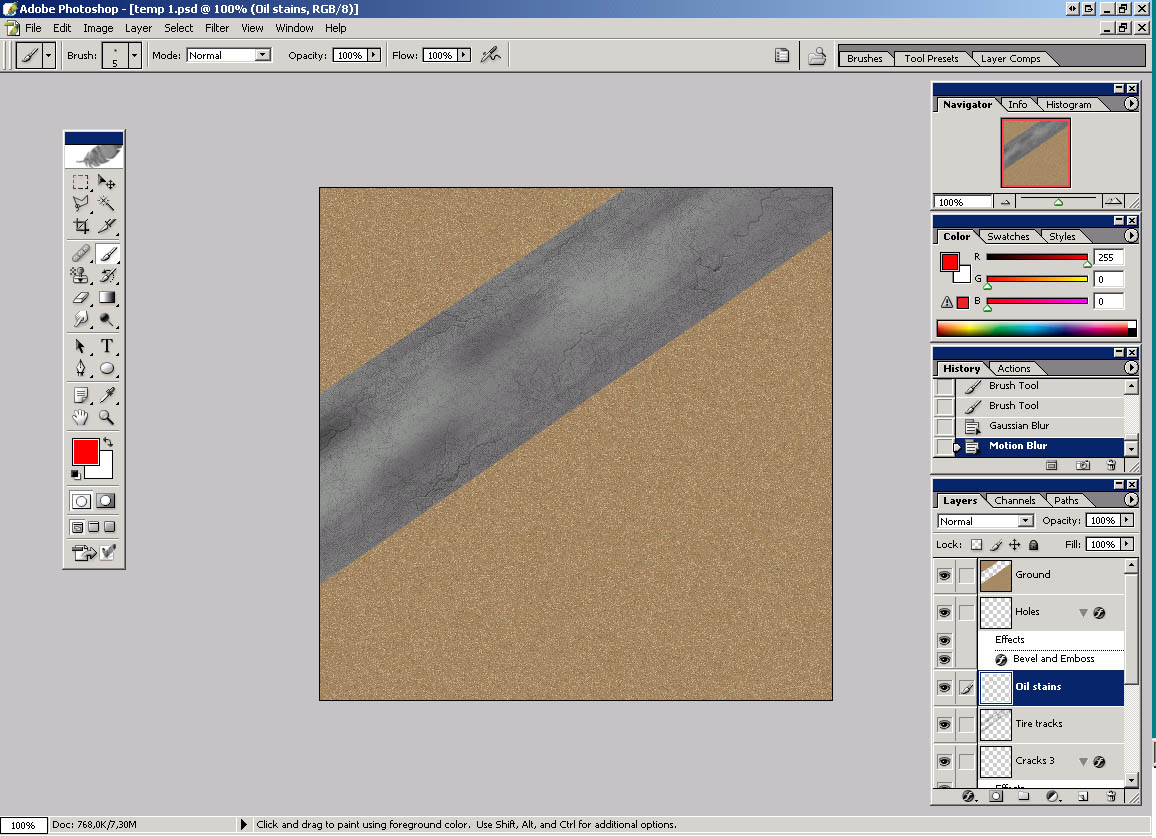
25) Go Filter->Blur->Gaussian Blur->set radius to 2 pixels. Go Blur->Motion Blur->set angle and distance as before (108 pix). It should look like this:
26) Select Ground layer, go Layer->Layer Style->Bevel and Emboss and set options like in the picture below: This will give illusion taht is ground slightly elevated against airstrip.
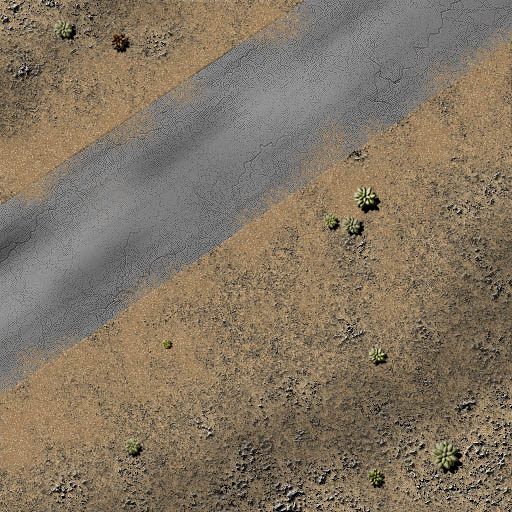
27) Finally this is the result with airstrip edges covered with sand pattern using spatter brush 59 pix.
It will be good to experiment with settings in this tutorial, especially with opacities to achieve best result.
You can find example made with this tutorial in zip file. I added few layers with sandstone textures and desert plants. Also, I sharpened airstrip once (Filter->Sharpen->Sharpen), I think it looks better. :)
Thanks to Neil, http://www.close-combat-now.com/ and CSO, http://www.closecombat.org for hosting this tutorial.
by dodam, heinrici45@yahoo.com